Yes, the efficient way of conveying the message is through speech or text, but it is more impactful when videos are embedded. Therefore, Screen recording is essential for gamers, educators, business professionals, and many others. If you are a Mac user and don’t know how to screen record on Mac, this guide is for you.
The feature of Screen recording provides a range of benefits, making life easier for many. Using this feature, you can capture every moment of your screen directly. You can save it in your system and edit it to create engaging content.
Suppose you know how to screen record on Mac, then you can explain your problem, showcase a solution, offer commentary or visually illustrate a specific message you wish to convey.
Utilize Built-In-Feature For Macbook Screen Recording
Many people demand a solution on how to screen record with audio on Mac. Here there are two important methods by which you can screen record on Mac with audio.
Using Screenshot Toolbar To Screen Record On Mac Along With Audio
Utilizing built-in features is the most convenient way to perform any activities on your device. Screenshot Toolbar is one of them. Macbook screen recording can be quickly done using this feature. You can have easy access to this feature if you currently use Mojave or a more recent version of macOS.
Screenshot Toolbar allows you to record the screen along with audio, with the only limitation being that it does not record internal audio such as game sound or any other system sound.
The steps mentioned below show how to screen record with sound on Mac using the Screenshot Toolbar:
-
Step 1 :- Launch The Screenshot Toolbar Application
Access this application by pressing and holding the shortcut key Shift + Command + 5.
-
Step 2 :- Start Recording Your Screen
To initiate recording, select the screen recording icon on the left to capture the entire screen, or alternatively, you can select the one on the right to record the specific area of the screen.
How To Factory Reset Iphone When Locked
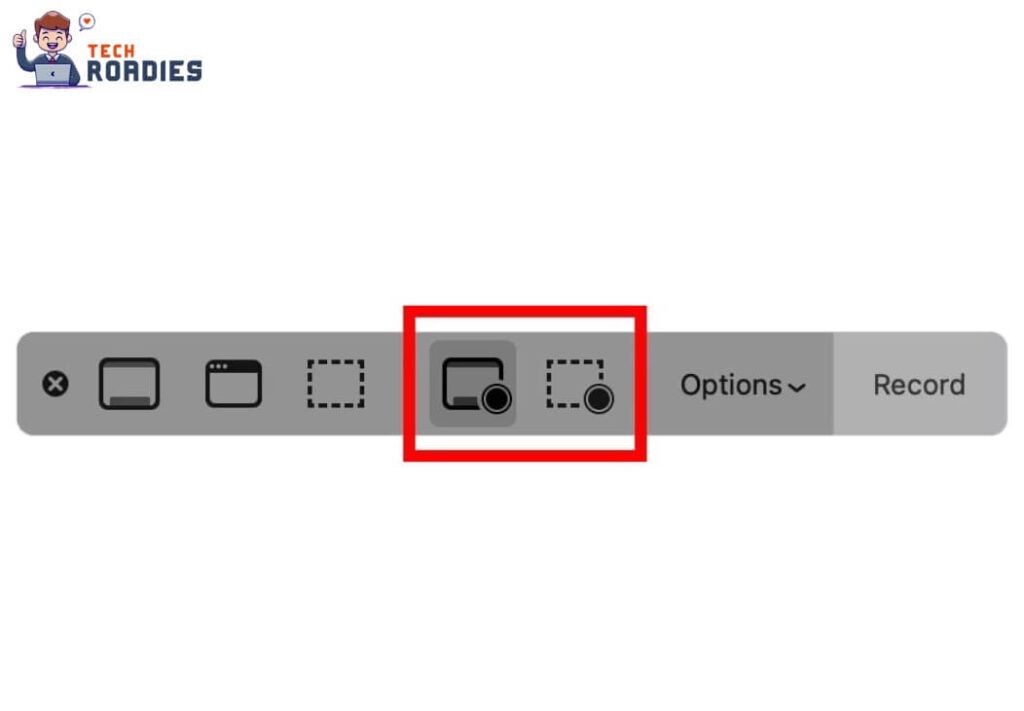
You need to drag your cursor and select the area you want to record when recording the specific area. After thet hit the “Record” button.
After you start recording, the control bar will automatically disappear.
-
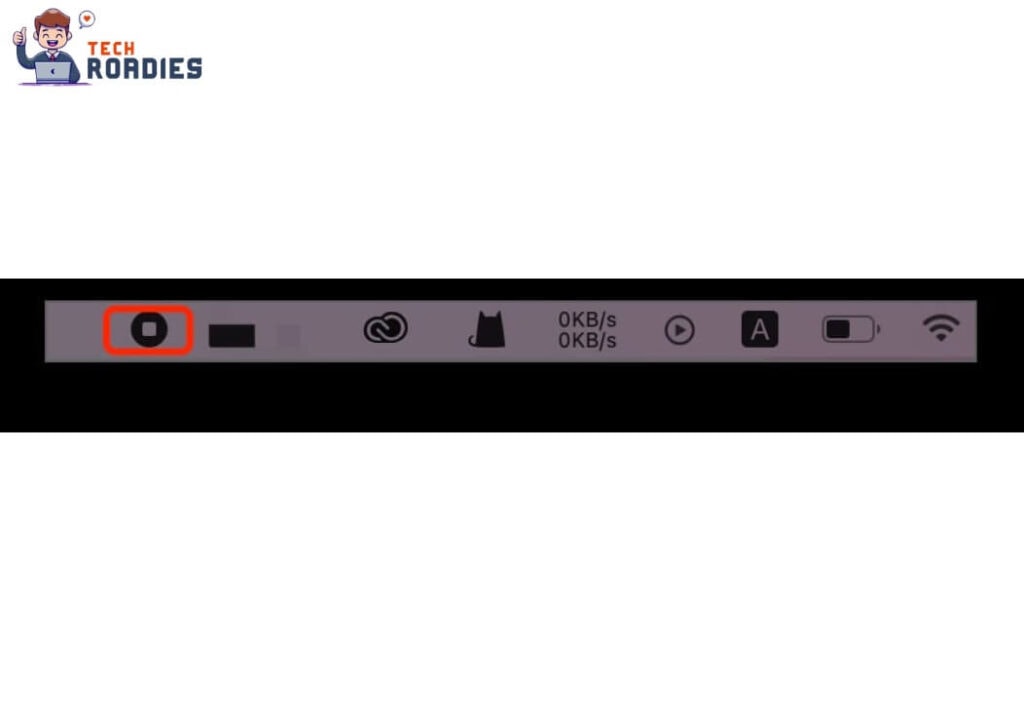
Step 3 :- End The Recording Process
To end the recording process, you can choose either the “Stop” icon in the menu bar or the shortcut keys Command + Control + Esc.
When completing the recording, a thumbnail of your recording will emerge at the bottom right of the screen for some period of time. You can either swipe right or take no action to save the recording.
Additionally, you can click on a thumbnail to access the trimming and sharing feature.
The method described above is quick, convenient, free and customizable. The steps mentioned in the method will help if you are a new Macbook user and need to learn how to screen record on Mac.
Proven Methods To Secure Your iPhone Data To iCloud
Using QuickTime Player To Screen Record On Mac Along With Audio
There is another method to learn how to screen record on Mac. This method includes a tool similar to the Screenshot toolbar. The tool is QuickTime Player.
QuickTime Player serves as an excellent media player that allows you to play videos and screencast your Mac. This super cool feature is almost available across every version of macOS. Not only can you play videos and record screens and movies with Audio, but also this feature allows you to make quick edits. Doesn’t it sound incredibly fantastic?
But are you aware that QuickTime Player lacks the capability to record system audio due to MacOS limitations? Fortunately, there is a solution if you wish to record internal audio when doing screen recording. These can be accomplished by combining QuickTime Player with Soundflower.
The steps described below provide a solution on how to screen record on Mac by using QuickTime Player and Soundflower software.
-
Step 1 :- Get Soundflower To Change It To Audio Output
Download Soundflower and launch it.
Before launching the application, set it as an audio output. This can be done by navigating to the “System Preference” option and selecting “Sound” and “Output” options.
Within the “Output” tab, you will have a wide range of available audio output devices. This includes Soundflower (2ch) and Soundflower (64ch). Select Soundflower (2ch), as it is the most preferred option. You can select Soundflower (64ch) to perform more advanced tasks.
-
Step 2 :- Start Recording Using The QuickTime Player App
Launch the QuickTime Player app and navigate to the Menu bar. Locate and click on the “File” option. Proceed further and select “New Screen Recording” present in the dropdown menu.
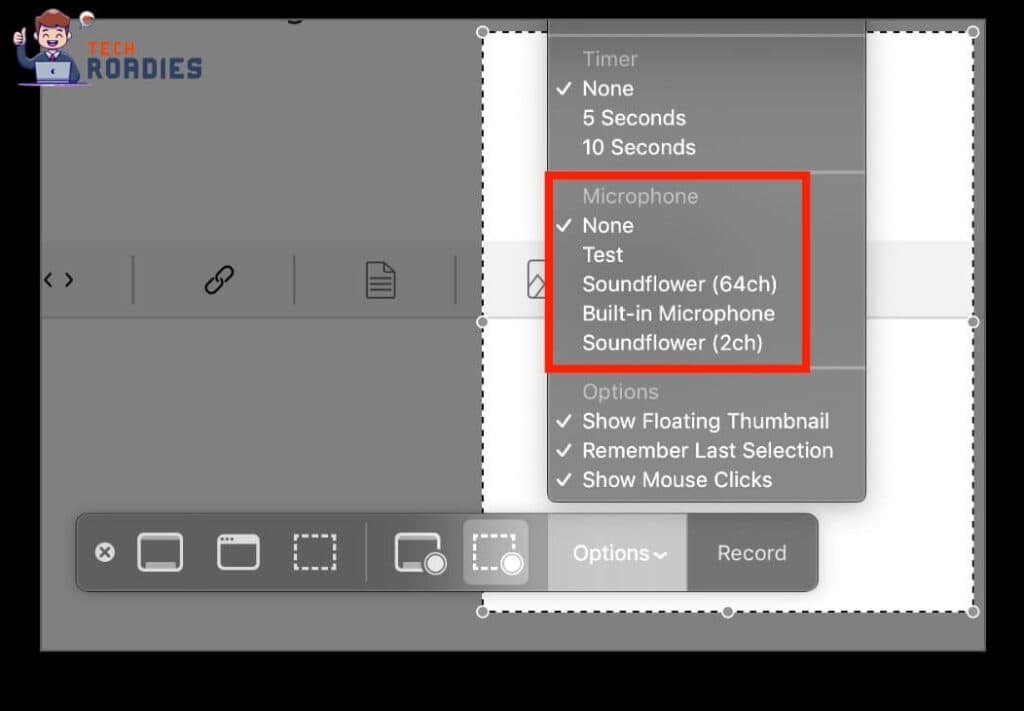
In the screen recording control bar, locate and click “Options.” From there, remember to select “Soundflower (2ch)” under the “Microphone” option.
Soundflower works by redirecting your system audio output to the microphone input. As a result, QuickTime Player recognizes that it is recording the microphone audio but is actually recording internal sound.
Two options are available: “Record Entire Screen” and “Record Selected Area”. Select any one of them based on your purpose and choice.
-
Step 3 :- Stop The Screen Recording
To end the recording process, you can click either the “Stop” icon in the menu bar or use the shortcut keys Command + Control + Esc.
The procedure is the same if you don’t want to record the internal audio of any game or other system. You just have to deselect the Soundflower sound output option in the “Output” tab.
Hence, these are the two in-built screen recorder macbook tools. You can record your screen with ease with these two features. Additionally, you have an option to screen record Macbook Pro by installing a third-party application available in the tech-market.
Conclusion:-
Hence, we have discussed two user-friendly screen recorder Mac features. The first method to record your Mac screen is using the screenshot toolbar. This method is free and convenient for screencasting your Mac with audio.
The other method is by using QuickTime Player. This method is also free and easy to implement. The Soundfower and QuickTime Player combination will allow you to record internal audio.
Hope you found a solution on how to screen record on mac. Record, edit and create good content. We have covered lot more topics with solutions on similar issues in our guide on apple products.
Frequently Asked Questions
Is it possible to screen record on Mac?
Yes, Mac allows you to screencast, create and edit recorded videos. There are two ways to screen recording. QuickTime Player and Screenshot Toolbar are the two inbuilt functions to record screens.
Which shortcut keys are used to start recording on the Mac?
Many people have difficulty in how to screen records on Mac. But it is easy. Press and hold Shift + Command + 5 keys to start screen recording.
What is the reason behind no audio during recording and what are the possible solutions for the same?
If you find that audio is not recorded along with screen recording, then it may be the case that you are using a program that doesn’t support audio. You may use QuickTime Player or the Screenshot toolbar, which provides audio recording capabilities, to capture your Mac screen with sound. Before beginning recording, double-check the audio input settings.
If you like this article please feel free to subscribe us for all the latest update and information. Make sure you share Tech Roadies with your friends and family members.